
- 01 / processInstall
SD1.5 checkpoint and official starter
- 02 / processDescribe
Publisher bottle prompt, 512-square canvas and fixed seed
- 03 / processGenerate
Sample latent, then decode pixels
- 04 / processKeep
Save image and export workflow JSON
Choose a route
| Route | Cost basis | What you need | What changes |
|---|---|---|---|
| Local ComfyUIFree local | No ComfyUI subscription; own hardware, electricity and model storage. | Compatible local hardware and exact model files; check installation requirements. | More setup and troubleshooting; local-model nodes need no paid API. |
| Comfy CloudPaid hosted | Paid subscription plus runtime credits; a limited free tier is advertised. Check live terms. | Account, available compatible models; Creator, Pro or Team for custom imports. | No local GPU required; uploads leave your device and allowances vary. |
Provider links are ordinary links. Free local software still needs hardware, storage and setup time; inspect current provider terms before paying.
Make one image and keep the recipe
A ComfyUI workflow connects the model, prompt, sampling settings and image export. This guide takes you from an empty setup to one saved image and a separate workflow file you can reopen. Start with the official purple-bottle example, then change the prompt to practise. It uses SD1.5 because the graph is small enough to understand; that does not make this older model the best choice for finished production images.
What we checked on 11 October 2026: the actual starter JSON, all seven nodes and nine connections, the publisher's 512 × 512 example PNG and its embedded generation settings. The graph and result screenshots below come from ComfyUI's own documentation. They are genuine publisher examples, not our own generation. We have not installed or run this workflow, measured its speed or confirmed your PC can complete it.
See the publisher's result first
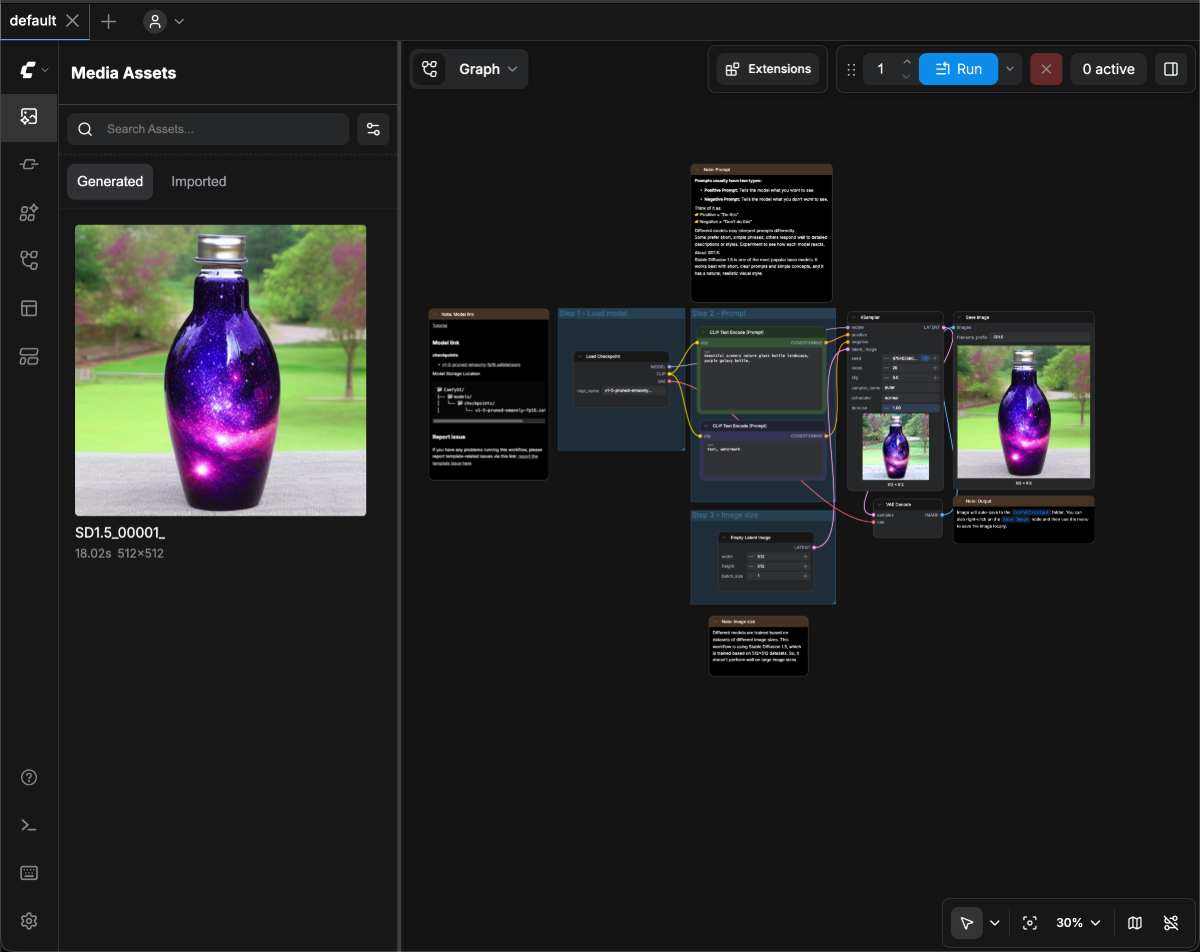
Publisher screenshot: Comfy-Org's first-generation result, reproduced unmodified from its documentation repository under GPL-3.0. Open the image to inspect it at full size. This newer screenshot demonstrates the output panel; its specific bottle image is not the older metadata-verified sample below.
For the exact recipe used in this lesson, open the publisher's original 512 × 512 workflow PNG. We inspected its embedded prompt and workflow data: the model filename, prompts, seed, size and sampler settings match the official starter JSON. Its workflow records comfy-core version 0.3.14; that is the publisher file's recorded version, not an executed version on our machine. The source does not establish its GPU, frontend version or generation time.
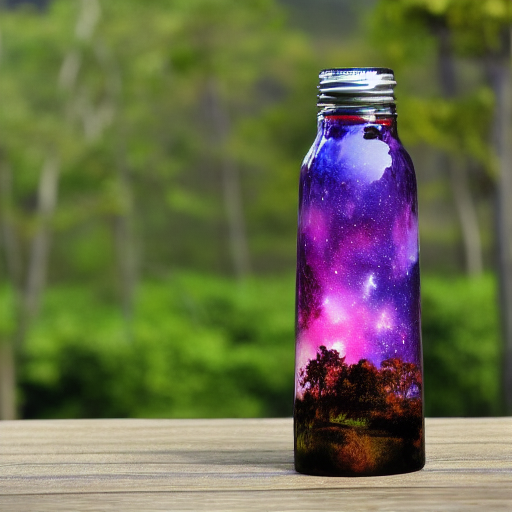
The original PNG is linked rather than republished because its separate example repository has no declared redistribution licence. The screenshot above includes an 18.02s label from a different publisher demonstration. It is not a benchmark for this recipe or your hardware.
Choose local or hosted
Free local: use ComfyUI with your own compatible hardware. The software route has no subscription, but model storage, hardware and electricity still matter. Read Can I run AI locally? before downloading. Follow the installation route for your operating system in the official requirements.
Hosted alternative: Comfy Cloud runs the editor on a provider's GPU. It advertises a free tier and paid subscriptions. The first-generation documentation and pricing page describe different free allowances, so check the live account offer rather than budgeting around a quoted credit number. Payment buys access to hosted compute; it does not guarantee a better image.
Prepare the model and starter
- Install and launch ComfyUI using the official first-generation guide. Record the installed ComfyUI and frontend versions in your reproduction notes. We have not pinned an executed software version.
- Download the official text-to-image.json, then use Workflows → Open to import it. This link fixes the inspected revision rather than silently changing with the next upstream edit. The starter uses built-in nodes; no third-party node pack is required. You can also drag the publisher's original workflow PNG into ComfyUI, but the documentation screenshot shown above is not an importable workflow.
- Download the exact v1-5-pruned-emaonly-fp16.safetensors checkpoint after reading its model card and licence. Save it under
ComfyUI/models/checkpoints. For Windows Portable this isComfyUI_windows_portable/ComfyUI/models/checkpoints. Desktop users should check their actual model directories in its Storage panel. - Refresh the model list with
Ror restart ComfyUI. Select that file in Load Checkpoint. A JSON workflow is the recipe, not a copy of the model weights. Importing it alone cannot install everything it needs.
Keep the downloaded filename intact. Do not substitute an SDXL, Flux or video model into this small SD1.5 lesson and expect the same graph to work. Those families have their own required loaders, conditioning and sampling arrangements.
Understand the connections
Read the graph from inputs to output. Load Checkpoint supplies MODEL to KSampler, CLIP to both CLIP Text Encode nodes, and VAE to VAE Decode. The two text encoders feed KSampler's positive and negative conditioning. Empty Latent Image feeds its latent_image input. KSampler's LATENT output goes to VAE Decode, whose IMAGE goes to Save Image.
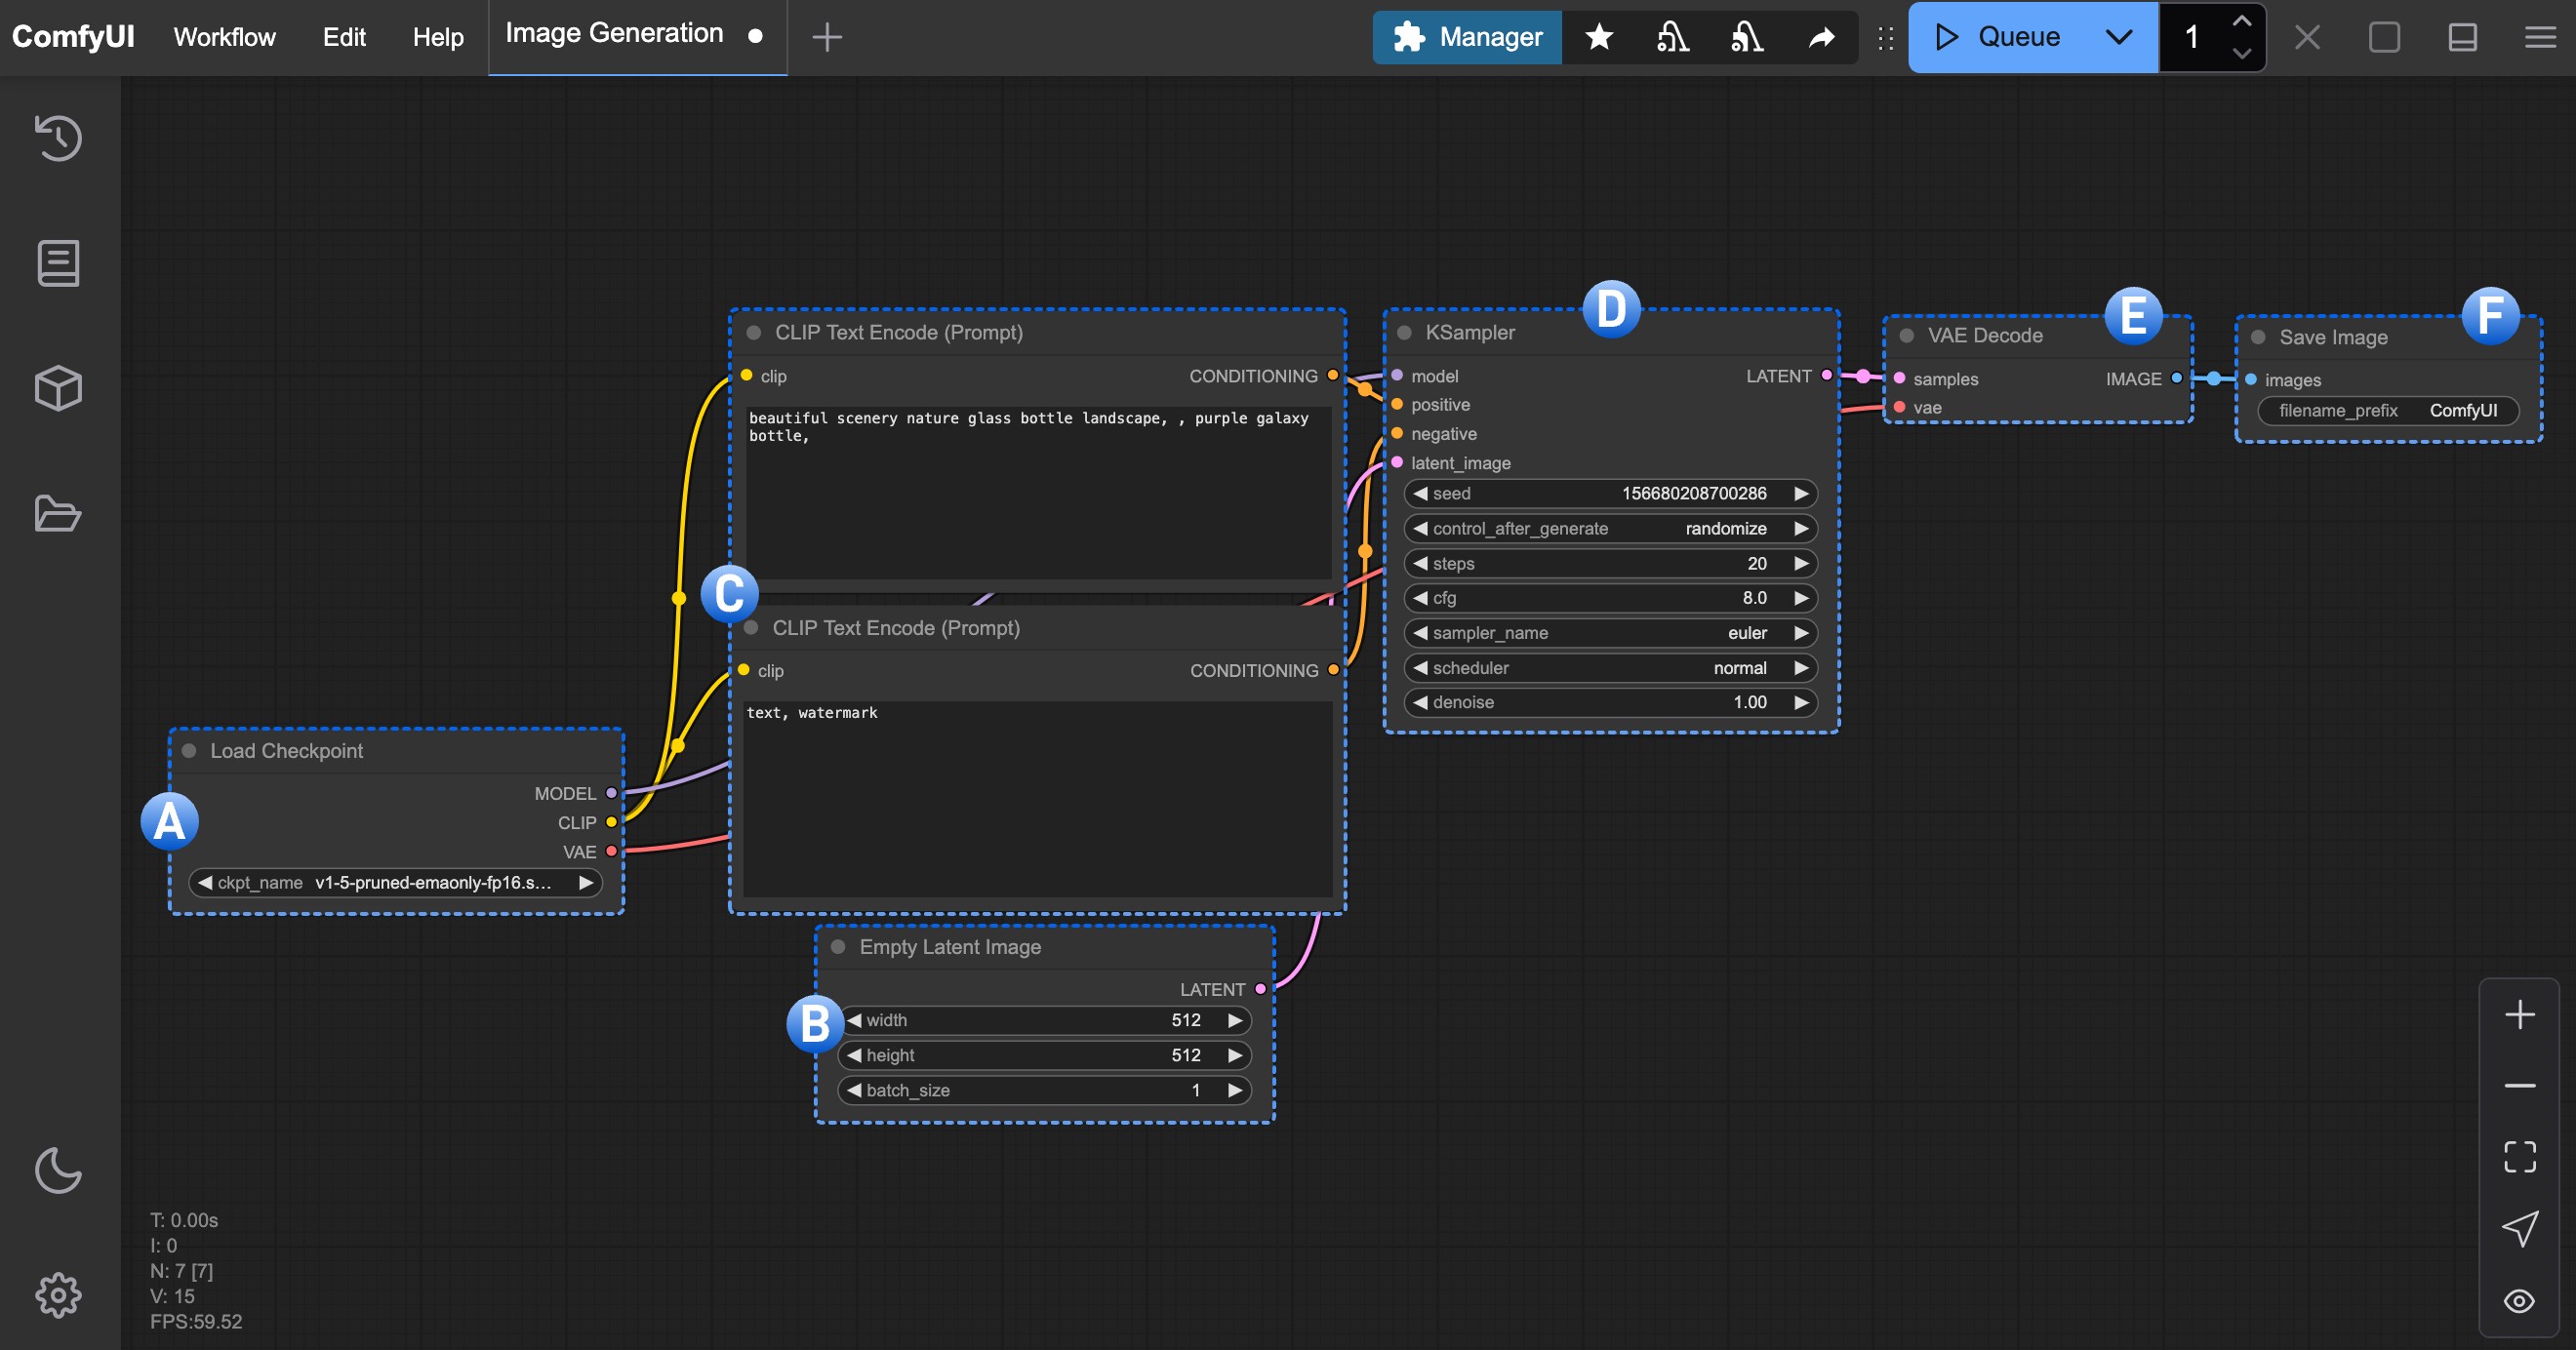
Publisher graph screenshot: Comfy-Org's text-to-image node walkthrough, reproduced unmodified under GPL-3.0. The seven-node graph matches the inspected JSON. It uses an older interface with a Queue button; current instructions call this Run. All settings are written below so you do not need to read tiny text in the screenshot.
These connections explain why a prompt cannot go straight into Save Image: text first becomes conditioning, sampling produces a latent representation, then decoding makes viewable pixels. See workflow and checkpoint if the terms are unfamiliar. The upstream node walkthrough explains the same stages.
Run the metadata-verified bottle recipe
- In the positive text encoder, keep the publisher's starter prompt exactly, including its repeated comma:
beautiful scenery nature glass bottle landscape, , purple galaxy bottle,
- Keep the negative text encoder at
text, watermark. This names things to discourage; it is not a guaranteed exclusion filter. - Check the following settings against your nodes:
| Setting | Value |
|---|---|
| Checkpoint | v1-5-pruned-emaonly-fp16.safetensors |
| Empty Latent Image width and height | 512 × 512 |
| Batch size | 1 |
| KSampler seed | 156680208700286 |
| Steps / CFG | 20 / 8 |
| Sampler / scheduler | euler / normal |
| Denoise | 1 |
| Save Image filename prefix | ComfyUI |
- Change KSampler's
control_after_generatefrom the starter'srandomizetofixedbefore clicking Run. Randomize can choose a new seed for the next queued run, so leaving it selected does not reliably repeat the embedded example's seed. We supply a fixed-seed adaptation of the inspected graph; it changes only this seed-control setting and is checked as JSON, not execution-tested. - Click Run or press
Ctrl + Enteron Windows/Linux; useCmd + Enteron macOS. These are the default shortcuts, which users can customise. Wait for the queue to finish. If there is an error, read the exact failing node before retrying. Repeatedly queuing the same broken graph will not fix a missing model.
Expect a square image prompted towards a glass bottle, landscape and purple galaxy. The publisher's original PNG is a real output from that recipe, but the same seed is not a promise of identical pixels across software, hardware or model revisions. Your own success check is a finished queue item and an exported 512 × 512 PNG, not matching a screenshot pixel for pixel.
Save, inspect and repeat
When successful, inspect the preview in Save Image and save it locally from the image menu. The local Save Image node also writes to ComfyUI/output. Open the saved file outside ComfyUI to confirm it exists and has the expected dimensions.
Use Workflows → Export to save the edited recipe as bottle-first-workflow.json. Keep the PNG, JSON, model filename, prompts, seed and version notes together. Test reopening the JSON before deleting your session. Retain the original upstream starter separately so you can recover from a broken edit.
The default Save Image implementation embeds workflow and prompt metadata in the PNG, unless metadata saving has been disabled. Drag your own original output back into the editor to check that it restores the recipe. A screenshot, a social-media upload or a re-encoded PNG may lack those fields. Keep the separate exported JSON regardless. The behaviour is implemented in ComfyUI's Save Image source.
Practise by changing the subject
Once the bottle route works, replace its positive prompt with our original practice prompt:
small cream-coloured robot, orange jacket, standing beside a wooden desk, three-quarter view, plain slate background, soft studio lighting, illustration
Set the negative prompt to text, watermark, duplicate subject, change the seed to 424242 and keep seed control fixed. Retain the other settings. This robot prompt is an untested exercise, with no published example presented as its result.
Save one output, then change only orange jacket to blue jacket, run again, and compare clothing, robot shape and background. A change outside the jacket reveals this text-to-image route's limits; it does not demonstrate perfect character control. Use masked inpainting when you need to target one area. The robot exercise JSON saves these proposed settings without claiming that generation has succeeded.
Run the hosted version
In Comfy Cloud, open the template browser or import your saved workflow. Confirm the selected checkpoint is available before running; a paid tier may be needed to import a missing custom model. Enter the same prompt and settings, then run and download the image from the output or queue panel. Also export the workflow JSON.
The pricing page describes subscriptions with credits spent on active workflow runtime and Partner Nodes. This starter uses local-model nodes, not a Partner API node. Record actual credits used, retries and successful output count if you compare costs. Do not use the provider's video examples as a measured cost for this image workflow.
Fix the common blockers
- Load Checkpoint shows null: check the complete filename and actual
checkpointsdirectory; refresh or restart after moving the file. - Missing nodes: this starter needs built-in nodes. Confirm you loaded the upstream file rather than another creator's extended graph; see missing-node diagnosis.
- Out of memory: keep batch size one and the small dimensions. Check model/runtime requirements; a file fitting on disk does not prove it fits in VRAM.
- The image ignores a detail: preserve the first output, change one phrase, then compare. More adjectives or sampling steps are not a reliable fix for every limitation.
The reader pack supplies the recipe prompt, dependency checklist and blank reproduction log. The separately linked JSON files are the inspected upstream recipe and clearly labelled adaptations; they contain no model weights. None is presented as execution-tested. Generation time, costs, actual failures and hardware compatibility remain unmeasured here.
Publisher recipe prompt
Comfy-Org official SD1.5 starter; unchanged recipe text. Robot practice text is a separate, untested exercise in the guide.
beautiful scenery nature glass bottle landscape, , purple galaxy bottle,Take the steps with you
Reader starter files
The guide, editable prompt, checklist, source register and a blank reproduction log. Also includes the publisher graph, fixed-seed adaptations, attributed documentation screenshots and licence/provenance. The graphs have not been executed here; no model weights or our own generated output are included.
Download the starter packSources and testing status
Primary references checked 2026-10-11. These are documentation-based instructions. We have not run or benchmarked the generation routes described here.
- Official ComfyUI system requirements
- Official first generation and model installation
- Official Comfy Cloud guide
- Comfy Cloud pricing and custom imports
- Official text-to-image node walkthrough
- Official text-to-image workflow JSON
- Exact SD1.5 checkpoint
- Original publisher PNG with embedded workflow
- Exact documentation revision and GPL-3.0 licence
- Default ComfyUI keyboard shortcuts
- Save Image source: output files and PNG metadata
- SD1.5 archival model card and declared OpenRAIL-M licence